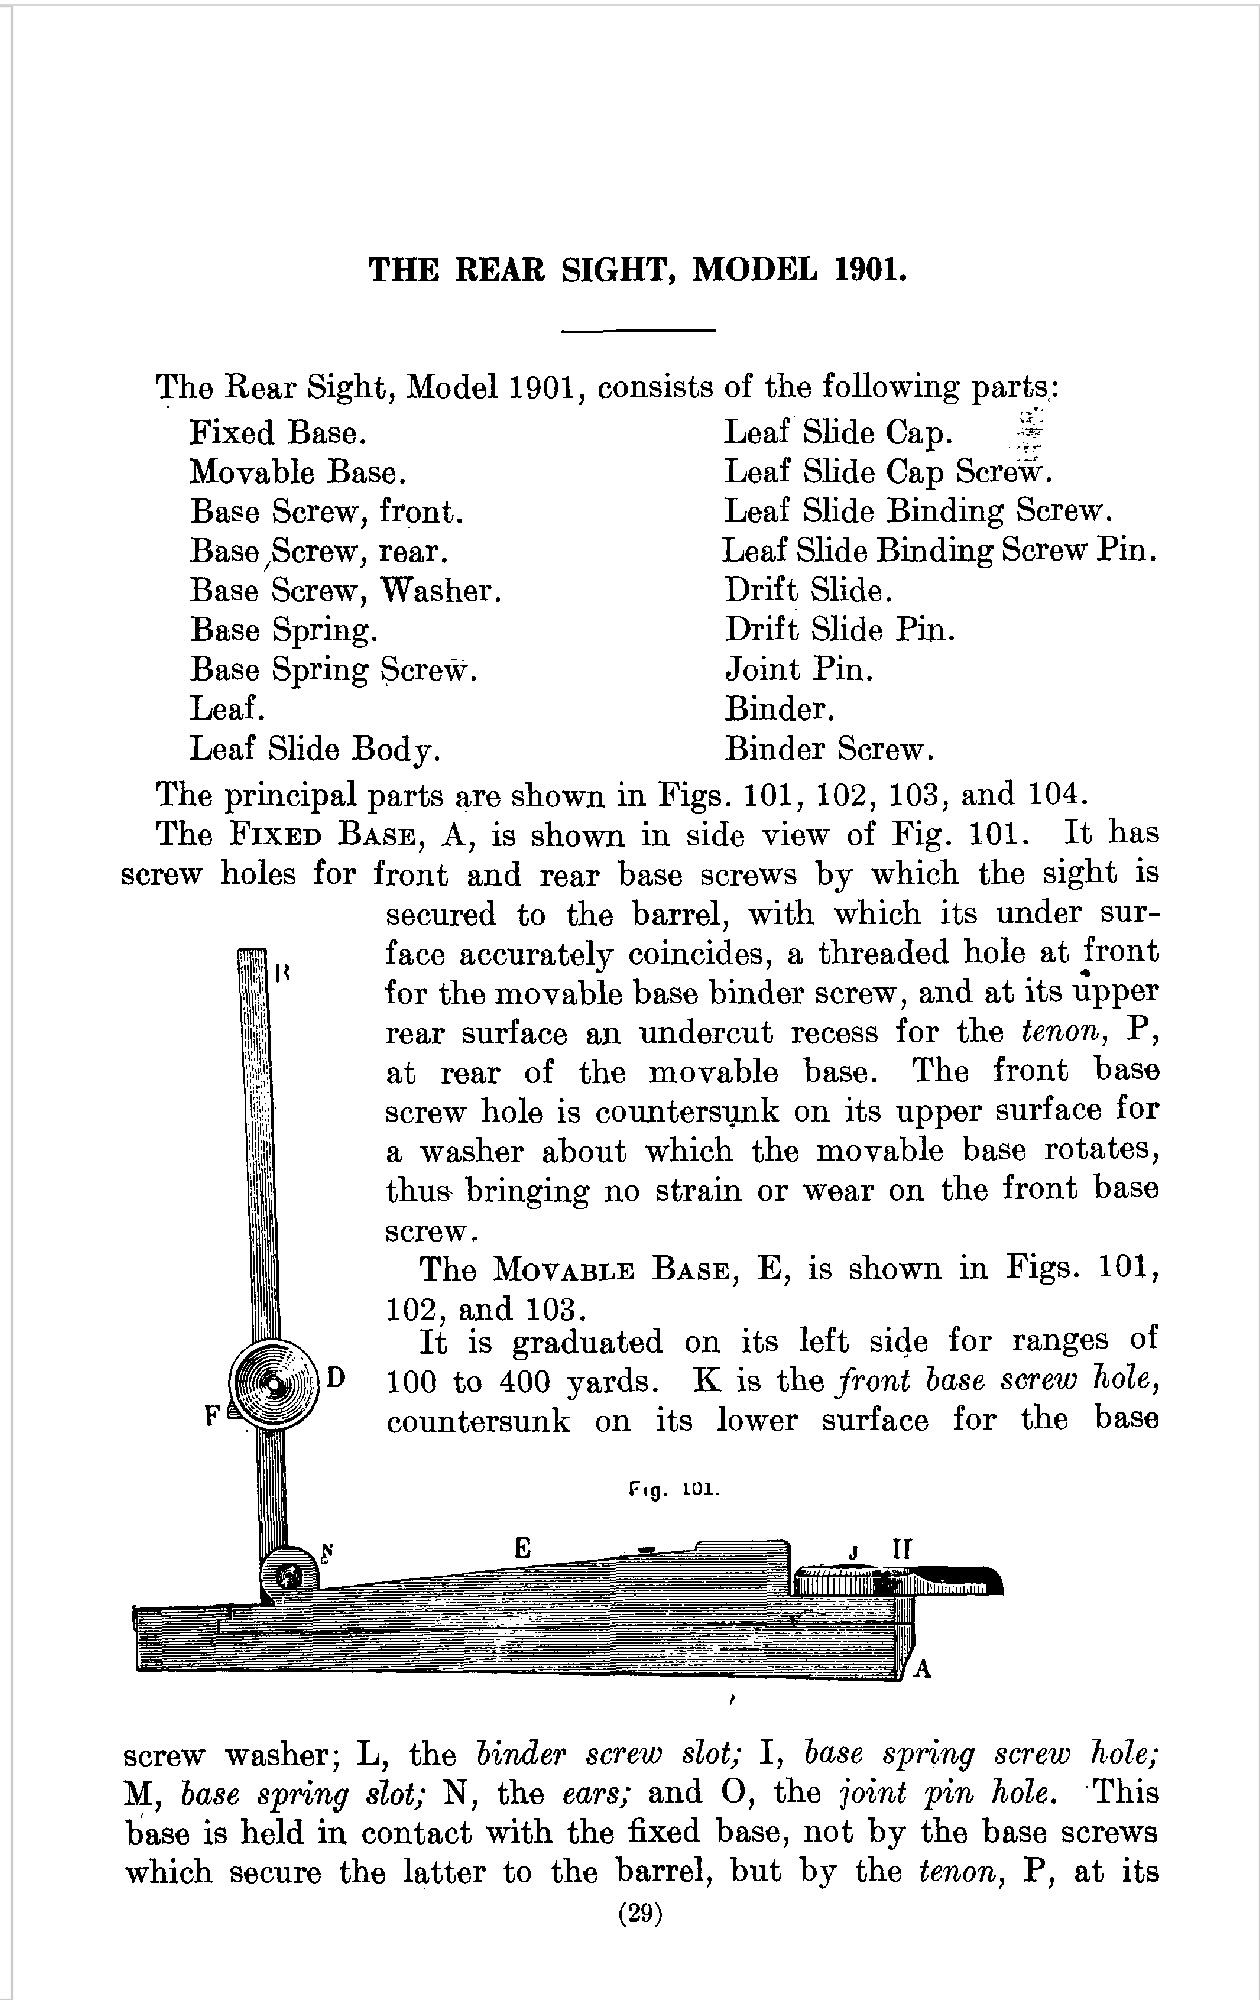
Two Days at the Range
With the exception of instructing at a Project Appleseed event, I can't remember the last time I went to the shooting range on two successive days. I bet if I looked in my notebooks, I'd find that it was the last time I competed at Camp Perry, which was in 2017. But whenever that might have been, yesterday and today were both range days, and it felt good to get out there. I only recently started going regularly again, as my recovery from back surgery has been much harder than I anticipated (I see this is my first blog entry since the one about my surgery - q.e.d.)
Because today is June 6 (D-Day+81), I'm going to write about the days in reverse order so that the D-Day photo becomes the signature photo for this entry. Like many other activities, it has been ages since I fired my M1 Garand, so I decided today was the day to dust it off and give it a little exercise in honor of those who went to war to help keep us free.
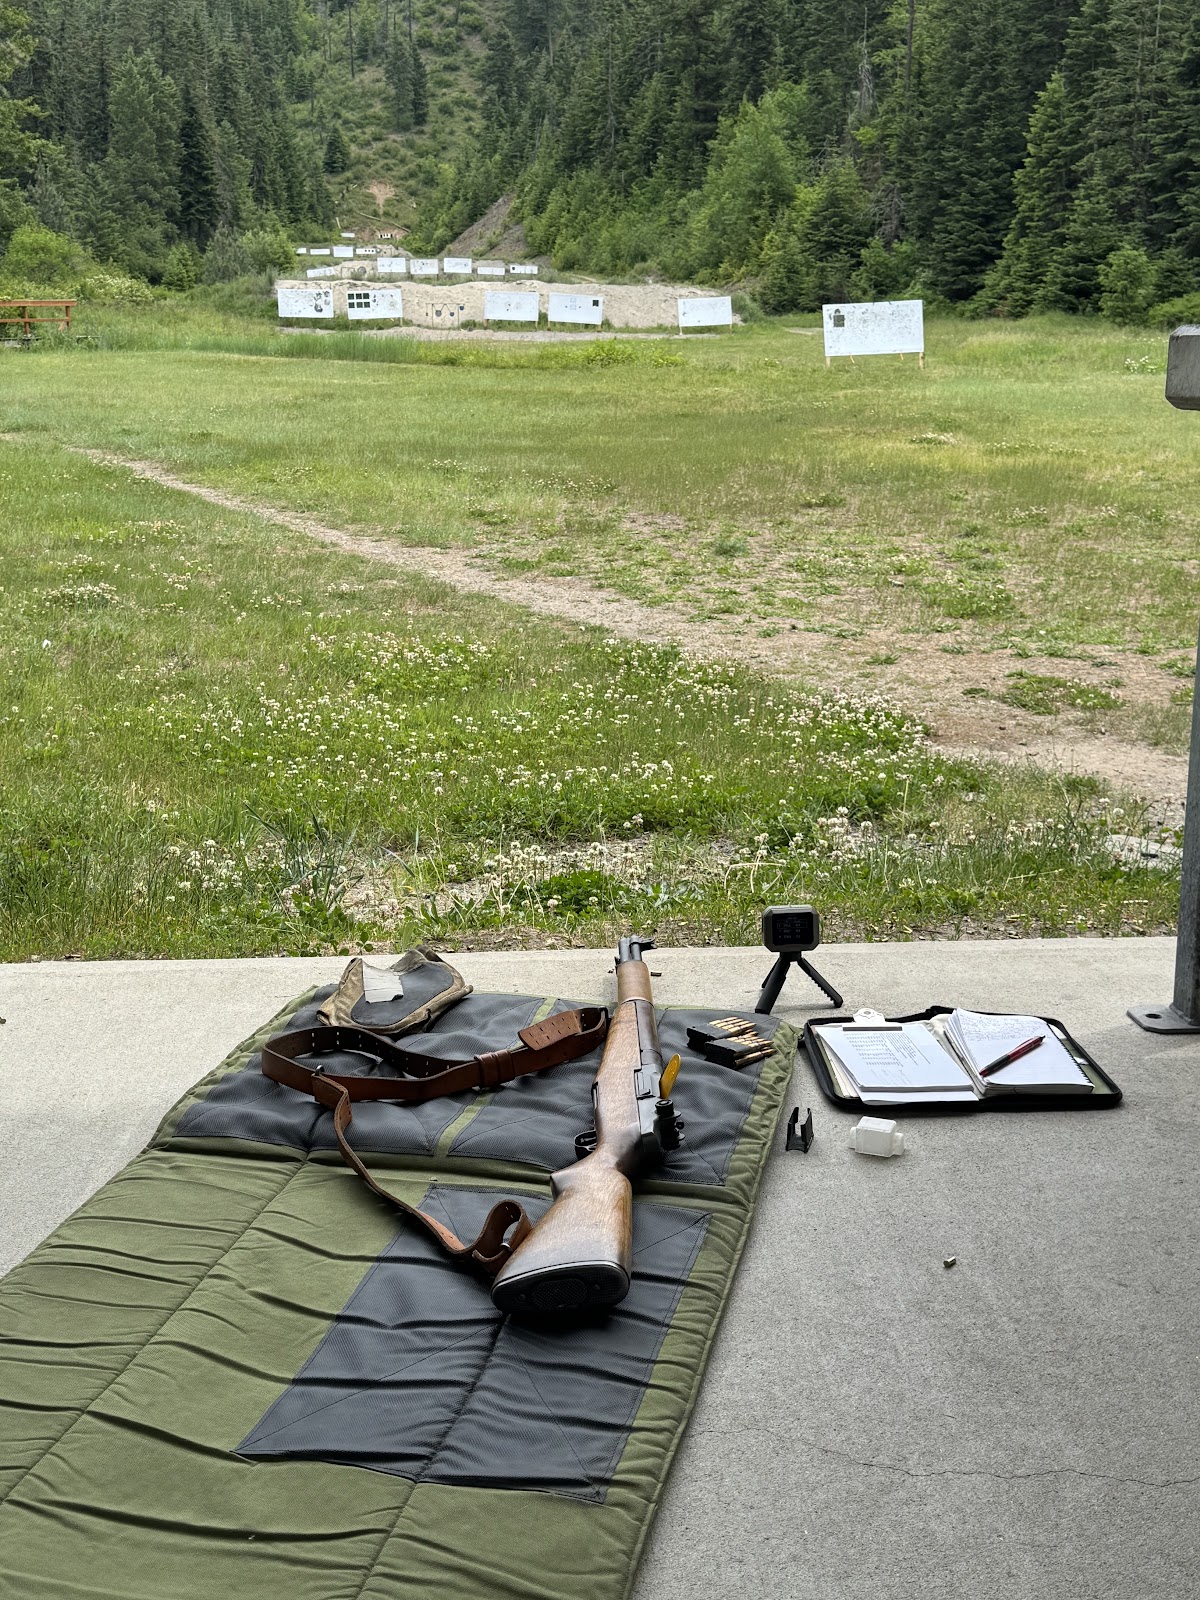 |
| My M1 Garand on the mat and ready to ring some steel in honor of D-Day+81 years. |
Having shot thousands of rounds through this rifle (it's on its third barrel), I know it very well, so I didn't take any targets, just planned to "ring steel" for awhile. This refers to hitting the steel plates that are permanently installed on our range at 100, 200, 300, and 400 yards. When a bullet hits the steel, there is a very satisfying "thwack" to confirm the hit. With the exception of the 100 yard range, the sound of the rifle firing and the sound coming back from the target are separated by enough time that you can actually hear the bullet's impact. At 100 yards I found it a little harder to separate the sounds. But since .30-06 is powerful enough to move even the larger steel plates, I was able to confirm that I'd hit just by looking to see if the plate was swinging. Shooting steel is fun, and I really didn't want to be walking downrange to check targets anyway - I am not quite ready to walk that far.
I've spent a lot of time down on the mat behind this rifle, so it was with great anticipation that I knelt down to "loop up" in the sling. I had decided to modify the configuration of my sling from the way I'd used it in competition for years, and set it up the way the Army taught it when the M1 was in service. Their way is slightly less stable than the modified competition setup I had learned to use, but has the advantage of being quick to get in and out of while still being able to carry the rifle by the sling if needed. Since I don't shoot in competition anymore, I just felt like being more historically accurate. When I looked into it, I found that the setup is almost identical except for the placement of one keeper (the little leather loop), so it would actually be very easy to go back and forth between the two configurations if I wanted to.
As it turned out, getting into the prone position was much harder than I'd expected. I didn't expect it to be easy, since my spine is now fused from T10-S1, but it wasn't just my back - my whole body protested. I just haven't been physically active enough yet to have regained flexibility, and motions that used to feel like slipping into my favorite easy chair (with similar feelings of relaxation and contentment) were physically demanding and painful. It turned out to be a very good thing that I was on the rifle range all by myself, as anybody listening to me would probably have called 911, lol!
I did eventually manage to contort myself into a reasonable prone position, sling and all, and fire a clip (eight rounds) at the 100-yard gongs (there were two, one large and one smaller). I got 8/8 hits, four at each. This was very encouraging and felt good to do after all this time.
I applied my known come-up from 100-200 yards (2 clicks elevation, i.e. 2 MOA), and shifted my aim to the 200 yard line. Unfortunately, the hanging steel plates were not visible from the prone position, due to the height of the intervening 100-yard berm. I guess most people at our club shoot from the bench, which is what I did. I got up from the mat and set up to shoot from the bench. Even sitting up, the larger of the plates was almost invisible as it was painted white, and I don't think I hit at all. After four shots, I switched to the smaller one and got two very satisfying hits and one probable, the fourth simply kicking up dust with no "thwack!"
Since I could clearly see the 300-yard steel plates, I switched back to the mat and went prone for another 8-round clip. After two shots, I decided that shooting prone is still just too hard for me (each successive line of targets requires that the rifle be aimed a little higher, and my body just doesn't bend that way yet!) So I switched to the bench, topped off the 8-round clip with loose rounds, and fired from there. 3/4 hits on the larger plate encouraged me to try for the smaller one. I don't' think I hit it, but was never really sure.
The preceding targets had finally used up the last of my M2 Ball ammunition head-stamped TW-56 (Twin Cities Army Ammunition Plant, 1956 production). This was the last of my regular practice ammo that was older than me - from now on I'll be shooting M2 Ball from Lake City (LC-66, -67, -69, or -72). I had to break into one of my wooden cases to get a can of Lake City to take with me today, and now it was time to start shooting it.
Except it wasn't. I repeatedly lose track and need to be reminded of just how much the healing process has taken out of me, and just how much work I have to do to regain my stamina. Today was no exception, and I realized I was just *done*. I did still have three clips and one loose round of some miscellaneous test reloads I had prepared years ago and just never shot up. I decided those would be fun to shoot standing, semi-rapid fire, at the 100-yard steel plates. Of the three eight-round clips, I hit the gong 7/8, 6/8, and 3/8 times, so it was clear I was tired and it was time to leave.
I packed up and drove back out past Fernan Lake, a beautiful drive that is a treat every time I go to and from the range. Rather than turn to go home, I decided to keep driving straight on Sherman to Schmidty's for lunch. They make the most decadent, delicious BBQ Bacon Cheddar Burger I have ever had - it never disappoints. So my final act in honor of D-Day was to enjoy a red-blooded American meal - bacon cheeseburger, onion rings, and a Coke (well, Dr. Pepper, but who's checking?)
 |
| Schmidty's BBQ Bacon Cheddar Burger is absolutely amazing. I've never gotten such thick bacon on a burger anywhere else. |
Thursday, 5 June, 2025
I am desperately in need of pistol practice, so I took exactly the same pistols to the range this week as I had the week before. My performance last week was dismal, and did not merit any photos (nor any publicity, lol). Hence the need for practice.
I shot at Project Appleseed Large Pistol Drill Targets at seven yards, the standard distance for our pistol clinics. I started off with a warm-up by shooting my CZ-75 with Kadet .22LR conversion kit. I fired one box of 50 rounds, two magazines of ten rounds two-handed, then ten rounds left-hand-only and ten rounds right-hand-only. My left-hand-only shooting was so awful that I decided I needed more practice, and fired the last ten rounds left-handed, five at a time (the same as the Appleseed Pistol Qualification Target).
 |
| My .22LR Targets. The notebook (photo below) shows the scores for successive strings of ten shots. Some were fired on the same target. |
I then switched to my Heckler & Koch P7M8, my preferred EDC gun for the last 40(+) years. I shot my standard practice load for this pistol: 4.0 grains of WIN 231, 124 gr. Berry's plated truncated cone bullet, and Winchester small pistol primers. After a five-round magazine to warm up and settle in with the different gun, I started firing ten-round strings, rapid fire with a magazine change (six rounds in the first magazine, four in the second, picked up from the bench just like an Appleseed PQT). I didn't use my shot timer. The PQT allows 15 seconds for these strings of fire, but I was practicing for muscle memory and focus so I left the time element out and just tried not to lollygag. (Humorous aside - one of the Girl Scouts at last week's Project Appleseed rifle clinic wore a t-shirt that said "Hang on while I overthink this". 🙂)
After doing this a few times, I switched to one-handed practice. I had intended to fire two targets left-handed and two targets right-handed, but my left-handed shooting was so bad that I fired at the two right-side targets left-handed instead. It was worthwhile, because I improved markedly on those last two. Practice makes perfect, and I need a *lot* more of it!
At this point I had exhausted that batch of practice ammo (32-2). I brought along a can of the next batch (32-3), but this batch used different brass that had not been shot as many times. I segregate my brass according to how many times it's been fired, so that when the cases start to fail (either by splitting or by failing to extract because the rims are so beaten up) I can simply discard the entire batch. This meant I had to pick up my expended brass before shooting any of the other batch. By the time I'd done that, I was ready to go.
(Photos to follow later - suddenly Google has freaked out and won't copy them in) (Later edit - figured it out - Google doesn't like iPhone "Live" photos. I need to turn that feature off. I'm sure it takes more storage, anyway.)
 |
| My HK P7M8 ready for shooting. Six-round mags on the left, four-round mags on the right. |
 |
| The seven yard targets seem closer in real life than in the photo. |
 |
| Two-handed shooting, rapid fire with magazine changes. |
 |
| More two-handed shooting, with relatively consistent performance. More practice will help keep them all in the black. |
 |
| Initially I intended to shoot two targets left-handed and two right-handed, so the first two left-handed targets are on the left, top and bottom. They were so bad that I fired the other two left-handed as well, with marked improvement by #4 (bottom right). |
 |
| A typical page from my pistol notebook. I have kept notes like this for every shooting session since October 1998. It really helps to be able to go back and look at data for guns that I haven't shot in a long time, to track ammo usage and round count per gun, and to gauge my progress (or lack thereof!) |
All in all a good day at the range, followed by another good day at the range. (I checked, and yes, the last time I did that was at Camp Perry in July 2017).
Mood: Happy and Reflective
Music: Wind in the trees and birds singing
posted by Brad @ 4:10:00 PM
1 comments
![]()
![]()